Need help? You can follow our simple step-by-step installations below, or you can download our comprehensive StoreFloor Compact installation guide.
If you are looking for the instructions for our regular (taller) StoreFloor, then please see this page.
You only need to clear a small area, by placing items already in the attic to one side. There’s no need to remove items from the attic altogether, as you can build the deck in stages and put items back on to an area you’ve completed. Insulate between the joists if it’s not already been done, but temporarily push aside any insulation that sits over the joists (this will be put back later). Make sure you have all your tools ready – you only need a tape measure, an electric drill and the screws that are supplied with the StoreFloor kits.
Align the Compact-Supports along the joists, avoiding obstacles and spacing them 24″ apart, along each joist (measured from the centre of one Compact-Support to the centre of the next one). Screw the supports into the joists through the two pre-drilled holes.
If you are close to a wall, hatch, or other obstruction, you can fit the Compact-Support at an angle as shown, so long as you fit the next Compact-Support in its normal inverted triangle position.
Slide the galvanised steel Cross-Beams on to the supports and secure them through the pre-drilled holes and slots. The sliding nature of the Cross-Beams gives you adjustment in case your joists are unevenly-spaced apart. There is no need for the Cross-Beams to meet exactly in the middle.
As well as supporting the end of each Cross-Beam, the Compact-Supports can also be used to support the centre of a Cross-Beam, to stiffen up the deck. In this case, to save time and minimise the number of screws, rotate the Compact-Support so that it rests on its other base and you are using it as a vertical leg, as shown in the photos.
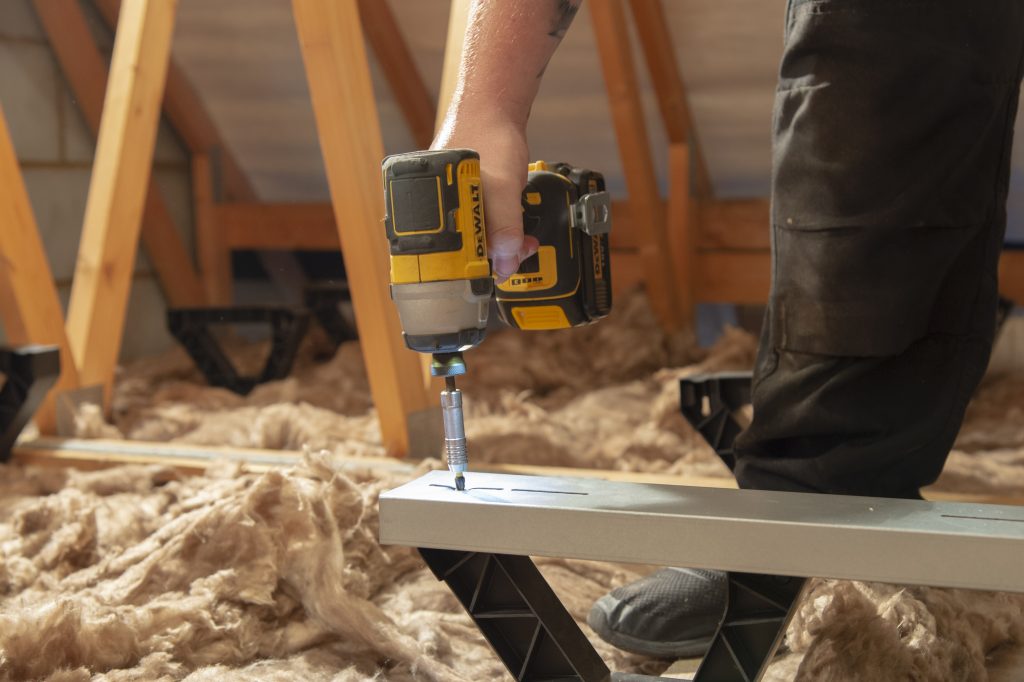
Screw the Compact-Support into the joist through any one of the two pre-drilled holes in its base, and then use another screw through the slit in the top of the Cross-Beam and into the hole in the support below. In our standard kits, we supply Compact-Supports to use like this under every second Cross-Beam. You can space them out evenly or concentrate them in areas of highest footfall or loading.
For more information on using Compact-Supports see our Frequently Asked Questions.
Fit the batts, rolls or loose-fill / blown-in insulation between the Cross-Beams, making sure it fits snugly around the supports, without any gaps.
Secure the deck by screwing attic boards into the top of the Cross-Beams. The screws self-tap into the metal; there is no need to align the screws with the slots in the top of the Cross-Beams. You don’t need to stagger the boards; the deck is strong enough with them just laid next to each other.
Whether you’re after complete kits for easy installation, or individual components for custom-sized decks, we’ve got everything you need.
Visit our install guide page to get a step by step walkthrough on the installation process of our StoreFloor products.
Our US site has recently undergone a rebranding from LoftZone to AtticZone, but don’t worry if you’re looking for our UK site, you can still find it at www.loftzone.co.uk.
Take a look at our rebranded site, we’re sure you’ll love it as much as our Attic boarding!